Hiya. How are you all doing?
Today we bring mum home for a few hours so, once again, I'll jump straight to the step by steps to this card I demo-ed on the Craft Extra channel on 18/6/22 at 2pm ...
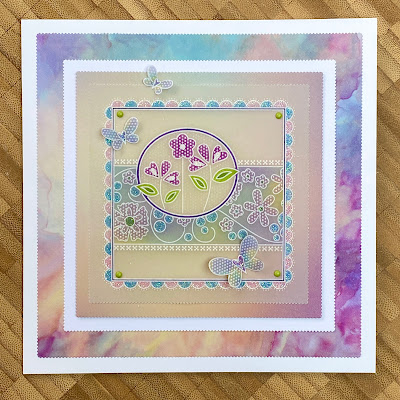
Groovi Plates:
Deluxe Groovi Plate Starter Kit + Butterfly Wreath A5 Square Plate GRO-SK-40709-XX
Nested Squares Picot Cut Die Set & Groovi Plate ACC-DI-30698-66
Tina’s Floral Petites Collection A6 Square Groovi Baby Plates & Spacer Set - GRO-FL-41187-01
Mini Straight & Diagonal Basic Bold A6 Square Groovi Piercing Grids GRO-GG-41099-23
NOTE:
All the embossing on this project is done on the back.
The colouring on this project is done on the back.

Step 2: Attach the parchment on the Nested Scallops Squares Groovi Plate using Groovi tabs and emboss 4th largest squares, scallops and dots using the Groovi No.1 tool (or Pergamano 1mm embossing ball tool).

Step 3: Over the Floral Window Groovi Plate in the Tina's Floral Petites Collection set, using the Groovi No.2 tool (or Pergamano 1.5mm embossing ball tool) emboss the circle in flower centre and tear drops in the flower petals. Emboss the rest of the design using Groovi No.1 tool (or Pergamano 1mm embossing ball tool).

Step 4: Over the Floral Panel Groovi Plate in the Tina's Floral Petites Collection set, emboss the panel using Groovi No.1 tool (or Pergamano 1mm embossing ball tool).

Step 5: Over the Mini Straight Piercing Grid, using Groovi No.2 tool (or Pergamano 1.5mm embossing ball tool), emboss 2 rows of dots above and below the panel.

Step 6: Over the Mini Diagonal Piercing Grid, using Groovi No.4 tool (or Pergamano 3mm embossing ball tool), emboss lightly between the floral design in the oval to give it some texture.

Step 7: Over the Mini Diagonal Piercing Grid, using Groovi No.2 tool (or Pergamano 1.5mm embossing ball tool), emboss dots in the flowers.

Step 8: Using the Groovi No.3 tool and Groovi No.2 tool (or Pergamano 3mm and 1.5mm embossing ball tool), over an embossing mat, freehand emboss in the flower centre and tear drop shapes for the whitework.

Step 9: Over an embossing mat, emboss crosses between the embossed dots along the panel using Groovi No.1 tool (or Pergamano 1mm embossing ball tool).

Step 10: Still working on the back, colour the panel using the Perga Liner B pencils. Blend the colours using a little Dorso oil on a sponge and a blending nib. Use a different nib for each colour if possible. If you have too much oil on your nib, the colour will come off, so blot off the excess on a piece of kitchen towel. If you have too little oil, the blending will not be smooth, so touch just the very tip of the nib on the Dorso oil for the tiniest amount of oil.

Step 11: Once the oil has evaporated and the work is completely dry, on the back, colour the flowers, leaves, circles in the panel and scallops with Perga Colours Exclusive pens.

Step 12: On a spare piece of parchment, emboss the 3 butterflies from the Garden Symphony Groovi Plate in the Tina's Floral Petites Collection set using Groovi No.1 tool (or Pergamano 1mm embossing ball tool).
Emboss dots in the wings over the Mini Diagonal Piercing Grid, using Groovi No.2 tool (or Pergamano 1.5mm embossing ball tool).
Using Perga liner B pencils colour the butterflie wings and blend with Dorso oil. Colour the hearts with Perga Colours Exclusive pen.
Cut out the butterflies (or perforate with a 2-needle perforating tool and picot cut).

I hope you enjoyed this step out and look forward to seeing all your creations.
Groovi plates and ingredients are available on http://www.claritystamp.com.
Sending everyone STAY SAFE WISHES sprinkled with PERGA GLITTER. Take care.
Lots of Love, Hugs and Laughter
Tina x