Hiya. Hope everyone is well. I am very well and have a proud mummy feeling... My 2 amazingly kind, awesome and talented babies have achieved so much, especially this academic year, with all the ups and downs they have been through over so many years.
It has been Dylan's final year at University and he received the Advantage Award for Personal Development which you can read all about on the blog piece he wrote for the uni website here Advantage Award for Personal Development
Megan took the year out to gain some work experience before she completes her final year at uni next year. One of the projects she worked on was for a deaf children's charity, Sound Waves Foundation. The children are often lost within the education system, leaving them struggling, feeling isolated and lonely. The animation was created as a step towards helping them believe in their dreams, access education and feel included. You can watch the animation here Sonic Boomers
We would really appreciate if you would share the YouTube link of the animation on your social media pages to raise awareness for as many children, parents and teachers.
Tonight we will celebrate with eating just desserts for dinner. But before getting carried away with all the fun and sugar overdose, let me share the step by step of the card I demostrated on Create and Craft a few days ago at 5pm which you can watch on rewind here Get Groovi with Tina Cox
Groovi Plates:
Deluxe Groovi Plate Starter Kit + Butterfly Wreath A5 Square Plate GRO-SK-40709-XX
Nested Squares Picot Cut Die Set & Groovi Plate ACC-DI-30698-66
Tina's Flowerette Parchlet Quartet A6 Square Groovi Plate Set GRO-FL-41823-01
Mini Straight & Diagonal Basic Bold A6 Square Groovi Piercing Grids GRO-GG-41099-23
NOTE:
All the embossing on this project is done on the back.
The colouring on this project is done on the back.
All the perforating and cutting on this project are done from the front.
Step 1: Die cut the 5th largest nested picot square on rainbow parchment paper (I've used Rose Garden) using the Nested Squares Picot dies. Before cutting, make sure you have placed the die with the cutting side down on the softer matt side facing up of the rainbow parchment.
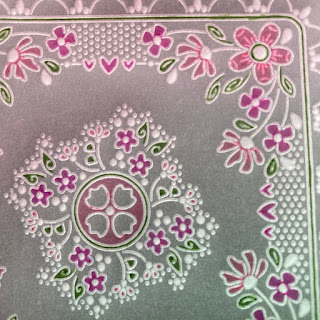
Step 2: On the rainbow parchment, with the glossy brighter side facing up (this is the back of the work), from the Flowerette Scallop Parchlet plate in the Tina's Flowerette Parchlet Quartet set, emboss the scallops border and the middle design (leaving out the large flowers) using the Groovi No.1 tool (or Pergamano 1mm embossing ball tool) and the tiny circles and ovals with the Groovi No.2 tool (or Pergamano 1.5mm embossing ball tool).
Step3: From the Flowerette Petal Parchlet plate in the Tina's Flowerette Parchlet Quartet set, emboss the 2 flower stems in the space between the previous embossed flower clusters using the Groovi No.1 tool (or Pergamano 1mm embossing ball tool) for the elements you want to just colour instead of emboss for whitework. For elements you want to do whitework on, use the Groovi No.2 tool (or Pergamano 1.5mm embossing ball tool) to emboss the line art.Step 4: In the corners, from the Flowerette Butterfly Parchlet plate in the Tina's Flowerette Parchlet Quartet set, emboss the line art using the Groovi No.1 tool (or Pergamano 1mm embossing ball tool) for the elements you want to just colour instead of emboss for whitework. For elements you want to do whitework on, use the Groovi No.2 tool (or Pergamano 1.5mm embossing ball tool) to emboss.
Step 5: Between the corner designs, emboss the hearts using the Groovi No.1 tool (or Pergamano 1mm embossing ball tool) from the Flowerette Heart Parchlet plate in the Tina's Flowerette Parchlet Quartet.
Step 6: Using the Groovi No.3 tool and Groovi No.2 tool (or Pergamano 3mm and 1.5mm embossing ball tool) freehand emboss inside the circles, ovals and little leaves for the whitework.

Step 8: Over the basic straight grid from the Mini Straight & Diagonal Basic Bold Piercing Grid set, emboss dots around the central design. To do this, using the Groovi No.2 tool (or Pergamano 1.5mm embossing ball tool), emboss a dot. Keep the ball tool on the dot and swivel the parchment slightly so the next hole on the grid is close to the embossed line and emboss a dot over that hole. Repeat all the way along and on the other side of the border.
Step 9: Still working on the back, colour using Perga Colours Exclusive pens.
This is what the work looks like on the front so far ...
To Finish: I added Perga glitter on all my embossed whitework. Mount the parchment work on the corresponding Rainbow paper using brads. Stick this on folded white card.

This one is the same design idea but done on regular parchment and no picot cutting, just lots more glitter...
I hope you enjoyed this step out and look forward to seeing all your creations.
Groovi plates and ingredients are available on http://www.claritystamp.com.
Sending everyone STAY SAFE WISHES sprinkled with PERGA GLITTER. Take care.
Lots of Love, Hugs and Laughter
Tina x


