Saturday, 16 July 2022

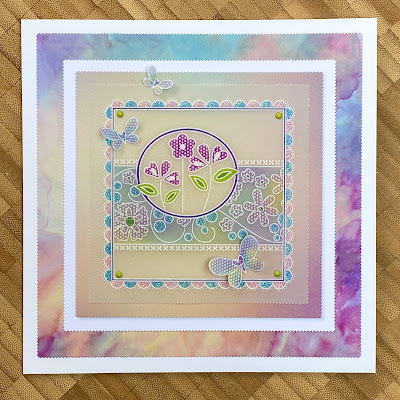
Pearl and Fun With Pattern No.1 Border Grids

Pattern No.1 Border Grids Fun ...

Good morning/afternoon/evening. Here is the step by steps for the card I demo-ed on Create and Craft on Thursday (14/7/22) at 11am for the Pergamano show ...

Groovi Plates:

Deluxe Groovi Plate Starter Kit + Butterfly Wreath A5 Square Plate GRO-SK-40709-XX

Art Deco Alphabet Groovi Border Plate Mate GRO-MA-40348-13

Nested Squares Picot Cut Die Set & Groovi Plate  ACC-DI-30698-66

Nested Circles Picot Cut Die Set & Groovi Plate  ACC-DI-30697-66

Straight Basic & Pattern No.1 Groovi Border Piercing Grids GRO-GG-41018-14

Diagonal Basic & Pattern No.1 Groovi Border Piercing Grids GRO-GG-41019-14


NOTE: 

All the embossing on this project is done on the back.

All the perforating and cutting on this project are done from the front.

Step 1: Die cut the smallest poppet (I have used Pearl from the Christmas collection) using the 4th smallest die from the Nested Circles Picot dies, and on coloured parchment (I have used the green from the Christmas parchment pack) using the 4th largest from the Nested Squares Picot dies, and on clear parchment using the 3rd largest die.

Step 2: With the glossy brighter side facing up (this is the back of the work), emboss the double square outlines from the corresponding Nested Picot Squares Groovi plate using the Groovi No.1 tool (or Pergamano 1mm embossing ball tool), in this case the 4th largest.

Step 3: In the middle, emboss the 5th smallest double circle outlines from the corresponding Nested Picot Circles Groovi plate using the Groovi No.1 tool (or Pergamano 1mm embossing ball tool).

Step 4: Over the Straight Pattern No.1 Groovi Border Piercing Grid, outside the circle, emboss the pattern as seen in the photo using the Groovi No.2 tool (or Pergamano 1.5mm embossing ball tool).

Step 5:  Keep the ball tool on the dot and swivel the parchment slightly so the next set of patterns on the grid are close to the embossed line and emboss the pattern over those holes. Repeat all the way around the circle.


Step 6: From the front, over the super foam and the Straight Pattern No.1 Groovi Border Piercing Grid, perforate these designs in the corners of the parchment using the bold 1-needle perforating tool.

Step 7: Turn the parchment over to the back, using pins, line up the perforations over the corresponding Straight Basic Groovi Border Piercing Grid and tape down the parchment using Groovi tabs before removing the pins.

Step 8: Emboss dots around the perforations using the Groovi No.2 tool (or Pergamano 1.5mm embossing ball tool).

Step 9: Between the corner designs, on the back, over the Diagonal Pattern No.1 Groovi Border Piercing Grid, emboss the daisy chain border using the Groovi No.2 tool (or Pergamano 1.5mm embossing ball tool).

Step 10: Once you have embossed along the 4 sides of the square, emboss the pattern in the corners too.

Step 11: Turn the parchment to the front, line up the embossed pattern over the super foam and the corresponding Diagonal Basic Groovi Border Piercing Grid, perforate a hole between the daisies using the bold 1-needle perforating tool.

Step 12: Over the embossing mat, emboss diagonal lines between the embossed dots in the daisies using Groovi No.1 tool (or Pergamano 0.5mm embossing ball tool) to turn them into snowflakes.

Step 13: On the back of the die cut Poppet, randomly emboss individual daisies over the Diagonal Pattern No.1 Groovi Border Piercing Grid using the Groovi No.2 tool (or Pergamano 1.5mm embossing ball tool).

Step 14: Over the embossing mat, emboss diagonal lines between the embossed dots in the daisies using Groovi No.1 tool (or Pergamano 0.5mm embossing ball tool) to turn them into snowflakes.

Step 15: On the die cut clear parchment, emboss the double square outlines from the corresponding Nested Picot Squares Groovi plate using the Groovi No.1 tool (or Pergamano 1mm embossing ball tool).

Step 16: Turn the parchment to the front, over the super foam and the Straight Pattern No.1 Groovi Border Piercing Grid, perforate only the slots and squares from the pattern (leaving out the hearts) using the bold 1-needle perforating tool Repeat on the other 3 sides.

Step 17: Turn the parchment over to the back, using pins, line up the perforations over the corresponding Straight Basic Groovi Border Piercing Grid and tape down the parchment using Groovi tabs before removing the pins.

Step 18: Emboss dots between the slots and square perforations using the Groovi No.2 tool (or Pergamano 1.5mm embossing ball tool). Repeat on the other 3 sides.

Step 19: On another piece of coloured parchment, with the glossy brighter side facing up (this is the back of the work), emboss the 2nd largest double square outlines from the Nested Picot Squares Groovi plate using the Groovi No.1 tool (or Pergamano 1mm embossing ball tool).

Step 20: Over the Straight Pattern No.1 Groovi Border Piercing Grid, from one side of the square to the other, emboss the pattern as seen in the photo using the Groovi No.2 tool (or Pergamano 1.5mm embossing ball tool). Repeat on the other 3 sides.

Step 11: Turn the parchment to the front, line up the embossed pattern over the super foam and the corresponding Straight Basic Groovi Border Piercing Grid, perforate within the embossed design using the bold 1-needle perforating tool.

To Finish : Cut the largest coloured parchment piece slightly larger than the border.
Cut a piece of white card the same size as the largest parchment piece.
Add Perga glitter on poppet and between the double square and circle outlines.
Layer and mount the pieces using brads.
Stick this on folded white 7"x7" card.

If you have these grids or if you are thinking of purchasing them in the future, I hope you have as much fun as I have playing with them each time. I would love to see your creations so please tag me on FB when you post in Groovi Worldwide and/or Clarity Worldwide groups.

Groovi plates and ingredients are available on  http://www.claritystamp.com.


Sending everyone STAY SAFE WISHES sprinkled with PERGA GLITTER. Take care.


Lots of Love, Hugs and Laughter

Tina x

Tuesday, 12 July 2022

Live Simply

Hiya. How is everyone? Here, in London, it has been glorious sunny days ... A bit too hot but still I'm enjoying my bones defrosting. And it gives me a perfect excuse to eat more ice-cream!

Yesterday I went to the East Northants Groovi Group after almost 2 years and I cannot explain in words how lovely it was to meet with old and new friends in person, receive all those hugs (and trust me they were very much needed and appreciated) and love. Alongside lots of chatting and giggling there was absolutely delicious pineapple cake, baked by Jean Page, and vanilla ice cream made by Rosalind McLellan. A massive thank you them, my Groovi Girls and everyone because you all made my day so very special. I made lots happy memories. Thank you.

I had a little play with Linda Williams Easy Layout Groovi plates a few days ago. Oh my golly gosh, they are such a clever fantastic idea, easy to use and fun! I had not seen the previous collections as I was on a break from the crafting world but now that I have these, I need more as I think it is going to become an addiction. I could use any on my other Groovi plates within the layouts to create beautiful cards. 

Another thing I had not come across till recently were Josie Davidson's Embossed Pattern Groovi Plates. Another brilliant idea and  I love love love these. Life has just become so much easier and a lot more fun. Another addiction!

This was the one I have created using some of the easy layout plates and embossed pattern plates... 


Groovi Plates:

Deluxe Groovi Plate Starter Kit + Butterfly Wreath A5 Square Plate GRO-SK-40709-XX

Linda Williams Love is All That Matters Easy Layout A5 Square Groovi Plate GRO-LO-41663-03

Linda Williams Live Simply, Bloom Wildly Easy Layout A5 Square Groovi Plate GRO-FL-41665-03

Linda Williams A Friend To Me Easy Layout A5 Square Groovi Plate GRO-FL-41662-03

Josie's Diagonal Embossed Patterns 1 A4 Square Groovi Plate GRO-GG-41733-24


NOTE: 

All the embossing on this project is done on the back.
The colouring on this project is done on the back.

All the perforating and cutting on this project are done from the front.


Step 1. Over the Love is All That Matters Groovi Plate, emboss the outside square and inner most border curve on the regular parchment using the Groovi No.1 tool (or Pergamano 1mm embossing ball tool).

Step 2: Emboss the pattern from Josie's Diagonal Embossed Patterns Groovi Plate using the Groovi No.2 tool (or Pergamano 1.5mm embossing ball tool). You will need the remove the parchment, realign the dots and reattach on the plate to cover the whole area.

Step 3: Over the Love is All That Matters Groovi Plate, on rainbow parchment (I have used Lemon Sorbet Sunrise), with the glossy brighter side facing up (this is the back of the work), emboss the 3 border curves and hearts and part of the outside square using the Groovi No.1 tool (or Pergamano 1mm embossing ball tool).

Step 4: Decide where you would like the circle element from Live Simply, Bloom Wildly Groovi Plate. Emboss the square using the Groovi No.1 tool (or Pergamano 1mm embossing ball tool). Remove the parchment and move it slightly so you can emboss over the break to complete the square.

Step 5: On a spare piece of regular parchment, emboss the square  using the Groovi No.1 tool (or Pergamano 1mm embossing ball tool) and dots using the  Groovi No.2 tool (or Pergamano 1.5mm embossing ball tool)

Step 6: In the middle of the circle, emboss the words and floral design from the Groovi plate. Emboss the circles using the Groovi No.2 tool (or Pergamano 1.5mm embossing ball tool) and the rest of the line art using the  Groovi No.1 tool (or Pergamano 1mm embossing ball tool).

Step 7: In the space above and below the words and floral design, emboss the pattern dots using the Groovi No.2 tool (or Pergamano 1.5mm embossing ball tool).

Step 8: In the section above the border curves, over the A Friend To Me Groovi Plate, emboss the full design (except the butterfly) using the Groovi No.1 tool (or Pergamano 1mm embossing ball tool).

Step 9: Using the Groovi No.1 tool (or Pergamano 1mm embossing ball tool), emboss the butterfly on the spare section of the rainbow parchment.

Step 10: Using the white end of the eraser pencil, remove the colour of the parchment in the flowers, leaves and butterflies.

Step 11: Using the Groovi No.2, No.3 and No.4 tools (or Pergamano 1mm, 1.5mm and 3mm embossing ball tools) emboss inside floral circles, fuchsia stamen and butterfly.

Step 12: Still working on the back, colour using Perga Colours Exclusive pens.

Step 13: On the back of the regular parchment piece, colour in the panels using the Perga Liner B pencils. Blend the colours using a little Dorso oil on a sponge and a blending nib. Use a different nib for each colour if possible. If you have too much oil on your nib, the colour will come off, so blot off the excess on a piece of kitchen towel. If you have too little oil, the blending will not be smooth, so touch just the very tip of the nib on the Dorso oil for the tiniest amount of oil.

Step 14: From the front, over the super foam, using Pergamano bold 2-needle perforating tool, perforate inside the border curves and hearts and outside these 3 the pieces.

Picot cut between all the perforations making sure the scissors are over the waste when you cut.


To Finish: Cut the parchment piece with Josie's grid pattern slightly larger than the rainbow parchment piece. Layer and mount the little regular parchment piece, the rainbow parchment piece, the grid pattern piece and the rainbow paper using brads. Stick this on folded white card. Stick the butterfly on the card using a teeny tiniest amount of Perga glue on the back of the butterfly body.


My life is pretty good at the moment as it has the Easy Layout plates, Embossed Pattern plates, Rainbow parchment and Ice Cream.

I hope it all makes sense and you get to have lots of fun.

Groovi plates and ingredients are available on  http://www.claritystamp.com.


Sending everyone STAY SAFE WISHES sprinkled with PERGA GLITTER. Take care.


Lots of Love, Hugs and Laughter

Tina x

Tuesday, 5 July 2022

Floral Petites Flower Stems

Good morning/afternoon/evening. Today I have the step by steps to this card that I demo-ed on the Create and Craft channel on 18/6/22 at 5pm ...


Groovi Plates:

Deluxe Groovi Plate Starter Kit + Butterfly Wreath A5 Square Plate  GRO-SK-40709-XX

Nested Squares Picot Cut Die Set & Groovi Plate  ACC-DI-30698-66

Nested Scallops Circles & Squares A5 Square Groovi Plate Set  GRO-PA-40573-03

Tina’s Floral Petites Collection A6 Square Groovi Baby Plates & Spacer Set - GRO-FL-41187-01

Mini Straight & Diagonal Basic Bold A6 Square Groovi Piercing Grids  GRO-GG-41099-23


NOTE: 

All the embossing on this project is done on the back.
The colouring on this project is done on the back.

All the perforating and cutting on this project are done from the front.


Step 1. Over the Nested Scallops Squares Groovi Plate, emboss the 3rd largest squares and scallops border on the Rainbow Parchment (I have used California Sunset), with the glossy brighter side facing up (this is the back of the work), using the Groovi No.1 tool (or Pergamano 1mm embossing ball tool).

Step 2: Over the Garden Symphony Groovi Plate in the Tina's Floral Petites Collection set, emboss the circles in the flower stem using the Groovi No.2 tool (or Pergamano 1.5mm embossing ball tool) and the rest of the flower stem using Groovi No.1 tool (or Pergamano 1mm embossing ball tool).


Step 3: Behind the flower stem emboss the 3rd smallest circles, scallops and dots from the Nested Scallops Circles Groovi Plate using the Groovi No.1 tool (or Pergamano 1mm embossing ball tool).

Step 4: On either side of the scalloped circle, emboss a border using the the swirl, leaf and flower design from the Floral Window Groovi Plate in the Tina's Floral Petites Collection set. Emboss the circles in the flower centres using the Groovi No.2 tool (or Pergamano 1.5mm embossing ball tool) and the rest of the design using Groovi No.1 tool (or Pergamano 1mm embossing ball tool).


Step 5: Emboss flower stems from the Meadow Flowers Groovi Plate in the Tina's Floral Petites Collection set. Emboss the circles in the flower centres using the Groovi No.2 tool (or Pergamano 1.5mm embossing ball tool) and the rest of the design using Groovi No.1 tool (or Pergamano 1mm embossing ball tool).


Step 6: Using the Groovi No.4 tool and Groovi No.3 tool (or Pergamano 3mm and 1.5mm embossing ball tool), over an embossing mat, freehand emboss in the little circles for the whitework.


Step 7: Still working on the back, colour the flowers on the long stems and leaves with Perga Colours Exclusive pens.


Step 8: From the front, over the super foam, using Pergamano bold 2-needle perforating tool, perforate between the floral design inside the scallop circle, between the elements in the swirl borders and inside and outside the scallops of the main square.

Picot cut between all the perforations making sure the scissors are over the waste when you cut.


To Finish: Add as much or as little (or none) Perga glitter on all the embossed whitework.
Using the Nested Squares Picot Dies, cut the largest and the 4th largest nested picot squares from corresponding Rainbow Paper and 3rd largest and largest nested picot square from white card.
Mount the parchment work on die cut Rainbow Paper and white card using brads.
Stick this on folded white card.

Here is some more inspiration using the Floral Petites Groovi plates ...


Groovi plates and ingredients are available on  http://www.claritystamp.com.


Sending everyone STAY SAFE WISHES sprinkled with PERGA GLITTER. Take care.


Lots of Love, Hugs and Laughter

Tina x

Sunday, 3 July 2022

Pretty with Floral Petites Collection

 Hiya. How are you all doing?

Today we bring mum home for a few hours so, once again, I'll jump straight to the step by steps to this card I demo-ed on the Craft Extra channel on 18/6/22 at 2pm ...


Groovi Plates:

Deluxe Groovi Plate Starter Kit + Butterfly Wreath A5 Square Plate  GRO-SK-40709-XX

Nested Squares Picot Cut Die Set & Groovi Plate  ACC-DI-30698-66

Nested Scallops Circles & Squares A5 Square Groovi Plate Set  GRO-PA-40573-03

Tina’s Floral Petites Collection A6 Square Groovi Baby Plates & Spacer Set - GRO-FL-41187-01

Mini Straight & Diagonal Basic Bold A6 Square Groovi Piercing Grids  GRO-GG-41099-23


NOTE: 

All the embossing on this project is done on the back.

The colouring on this project is done on the back.


Step 1. Die-cut the 5th largest nested picot square on clear parchment using the Nested Squares Picot Dies.

Step 2: Attach the parchment on the Nested Scallops Squares Groovi Plate using Groovi tabs and emboss 4th largest squares, scallops and dots using the Groovi No.1 tool (or Pergamano 1mm embossing ball tool).


Step 3: Over the Floral Window Groovi Plate in the Tina's Floral Petites Collection set, using the Groovi No.2 tool (or Pergamano 1.5mm embossing ball tool) emboss the circle in flower centre and tear drops in the flower petals. Emboss the rest of the design using Groovi No.1 tool (or Pergamano 1mm embossing ball tool).

Step 4: Over the Floral Panel Groovi Plate in the Tina's Floral Petites Collection set, emboss the panel using Groovi No.1 tool (or Pergamano 1mm embossing ball tool).


Step 5: Over the Mini Straight Piercing Grid, using Groovi No.2 tool (or Pergamano 1.5mm embossing ball tool), emboss 2 rows of dots above and below the panel.


Step 6: Over the Mini Diagonal Piercing Grid, using Groovi No.4 tool (or Pergamano 3mm embossing ball tool), emboss lightly between the floral design in the oval to give it some texture.


Step 7: Over the Mini Diagonal Piercing Grid, using Groovi No.2 tool (or Pergamano 1.5mm embossing ball tool), emboss dots in the flowers.


Step 8: Using the Groovi No.3 tool and Groovi No.2 tool (or Pergamano 3mm and 1.5mm embossing ball tool), over an embossing mat, freehand emboss in the flower centre and tear drop shapes for the whitework.


Step 9: Over an embossing mat, emboss crosses between the embossed dots along the panel using Groovi No.1 tool (or Pergamano 1mm embossing ball tool).


Step 10: Still working on the back, colour the panel using the Perga Liner B pencils. Blend the colours using a little Dorso oil on a sponge and a blending nib. Use a different nib for each colour if possible. If you have too much oil on your nib, the colour will come off, so blot off the excess on a piece of kitchen towel. If you have too little oil, the blending will not be smooth, so touch just the very tip of the nib on the Dorso oil for the tiniest amount of oil.


Step 11: Once the oil has evaporated and the work is completely dry, on the back, colour the flowers, leaves, circles in the panel and scallops with Perga Colours Exclusive pens.


Step 12: On a spare piece of parchment, emboss the 3 butterflies from the Garden Symphony Groovi Plate in the Tina's Floral Petites Collection set using Groovi No.1 tool (or Pergamano 1mm embossing ball tool). 

Emboss dots in the wings over the Mini Diagonal Piercing Grid, using Groovi No.2 tool (or Pergamano 1.5mm embossing ball tool).

Using Perga liner B pencils colour the butterflie wings and blend with Dorso oil. Colour the hearts with Perga Colours Exclusive pen.

Cut out the butterflies (or perforate with a 2-needle perforating tool and picot cut).


To Finish: Add as much or as little (or none) Perga glitter on all the embossed whitework.
Using the Nested Squares Picot Dies, cut the largest and the 4th largest nested picot squares from Clarity Designer Paper (I have used Indian Summer) and 5th largest and largest nested picot square from white card.
Mount the parchment work on die cut Designer Paper and white card using brads.
Stick this on folded white card.
Stick the butterflies on the card using a tiny amount on Perga glue on the back on butterfly hearts.


I hope you enjoyed this step out and look forward to seeing all your creations.


Groovi plates and ingredients are available on  http://www.claritystamp.com.


Sending everyone STAY SAFE WISHES sprinkled with PERGA GLITTER. Take care.


Lots of Love, Hugs and Laughter

Tina x