Hi everyone,
Hope everyone is well as are their loved ones? We are all good at mum's, still staying indoors unless I need to go out for essentials. I'm still not confident enough to venture out for more than that. Yesterday and today would have been the Clarity open days but due to Covid-19 that isn't happening so that everyone can stay safe. However, ClarityStamp headquarters came up with an excellent idea of doing it online where we can still celebrate the open day by sharing our makes on social media and use #HappydayClarityday when sharing our work. If you are not on ClarityStamp groups on Facebook, join them as there is a whole loving, caring and encouraging community that is always ready to help and support you while sharing their beautiful makes. Watch out for the giveaways, blogs, step by steps on :-
For Groovi Worldwide: https://www.facebook.com/groups/168389163628763/
For Clarity Worldwide: https://www.facebook.com/groups/709190752576155/
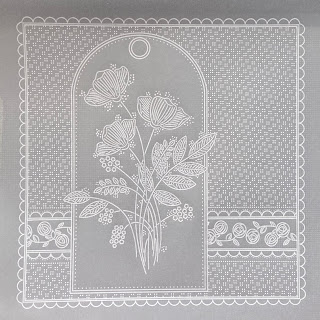
Today I want to share with you the step by steps for this Floral Tag card...
Groovi Plates:
Alphabet & Numbers A4 Square Groovi Plate Mate GRO-WO-40875-21
Calligraphy Alphabet A5 Groovi Plate Mate GRO-MA-40517-08
Nested Scallops Squares Extension A4 Square Groovi Plate GRO-WO-41168-15
Nested Arch Tags A5 Groovi Plate GRO-PA-41465-04
Tina’s Floral Spray A6 Groovi Plate GRO-FL-41401-02
Straight Super Fine A4 Groovi Piercing Grid GRO-GG-40626-17
Step 1: Emboss the 3rd from outside double square outlines and scallops from the Nested Scallops Squares Extension plate using the Pergamano 1mm embossing ball tool (or Groovi No.1).
Step 2: Emboss the floral design from the Tina’s Floral Spray plate using the Pergamano 1mm embossing ball tool (or Groovi No.1).
Step 3: Emboss the tag from the Nested Arch Tags plate around the floral design using the Pergamano 1mm embossing ball tool (or Groovi No.1).
Step 4: Emboss lines, scallops and dots from the Nested Scallops Squares Extension plate as seen on the photo using the Pergamano 1mm embossing ball tool (or Groovi No.1).
Step 5: Emboss the floral border from the Nested Arch Tags plate using the Pergamano 1mm embossing ball tool (or Groovi No.1).
Step 6: Emboss lines, scallops and dots from the Nested Scallops Squares Extension plate below the floral border using the Pergamano 1mm embossing ball tool (or Groovi No.1).
Step 7: Emboss the grid design over the Straight Super Fine A4 Groovi Piercing Grid plate using the Pergamano 1mm embossing ball tool (or Groovi No.2). If you want larger dots, use the Straight Basic Bold A4 Groovi Piercing Grid plate (GRO-GG-40528-17) and the Pergamano 1.5mm embossing ball tool (or Groovi No.2).
Step 8: On the back, colour the tag and flower border with Pergaliner B pencil (B14) and blend with Dorso oil.
Step 9: Still on the back, colour the flowers, leaves and between the double square outlines with Perga Colours Exclusives (No.5, No.9 and No.17).
Step 10: From the front, perforate inside the scallops and outside the main card using the Pergamano bold 2-needle perforating tool and picot cut between the perforation.
To finish: Mount the piece on Rainbow River designer paper using brads and stick it on white card. Stick a bow at the top using a glue dot.
Looking forward to seeing everyones creations using these Groovi plates. For the products used here, visit http://www.claritystamp.com. They have a massive sale, their biggest sale they have ever had with most products on sale they have had on offer at one time so check out their website and grab the bargains. Enjoy.
Love you all. Take care.
Sending everyone SAFE WISHES sprinkled with PERGA GLITTER.
Love and laughter
Tina x


