Sunday, 21 June 2020

Happy, Joyous & Free #HappyDayClarityDay

Meeeeee again. Everyone enjoying the virtual ClarityStamp open days? There is so much inspiration on Clarity team blogs and social media. Lots of giveaways. And, of course, the amazing sale on so many products. Don't forget the sale ends midnight tonight so go have a peek and treat yourself to some awesome products at bargain prizes.

For this afternoon, I have gone all the way back to the first plate I designed to ClarityStamp which was the bamboo plate.


Groovi Plates:
Groovi Plate Starter Kit Deluxe  GRO-SK-40571-XX
Word Chain Alphabet Groovi Border Plate Mate  GRO-MA-40559-13
Nested Squares Picot Cut Die Set & Groovi Plate  ACC-DI-30698-66
Bamboo A5 Square Groovi Plate  GRO-GR-40310-03
Large Lace Netting A5 Square Groovi Plate  GRO-PA-40339-03
Straight Basic & Pattern No.1 Groovi Border Piercing Grids  GRO-GG-41018-14

Ingredients:
1mm Pergamano Ball Tool - Extra Small  PER-TO-70011
1.5mm Pergamano Ball Tool - Small  PER-TO-70004-XX
Embossing Tool 1.2mm Shader  PER-TO-70003-XX
1-Needle Bold Perforating Tool  PER-TO-70028-XX
2-Needle Bold Perforating Tool  PER-TO-70279-XX
Pergamano Ringlock Scissors  PER-TO-70041-XX  (or Pergamano Exclusive Pointed Scissors or Perga Cutter - curved)
Perga Liners - Combi Box  PER-CO-70063-XX
Dorso Oil  PER-CO-70066-XX
Perga Colours Exclusive  PER-CO-70060-XX
Clarity Lightwave LED Light Panel + Free A4 Translucent Piercing Mat  ACC-LP-30352-A4
Groovi A5 Parchment (20 Sheets)  GRO-AC-40020-XX
Groovi Guard  GRO-AC-40345-XX
Groovi Sticker Tabs  GRO-AC-40437-XX
A4 Translucent White Super Foam  GRO-AC-40603-A4
A4 Picot Foam  GRO-AC-40625-XX
Perga Glue  PER-AC-70133-XX
Pastel Mix Pergamano Brads  PER-AC-70270-XX
Indian Summer Duet Designer Paper  ACC-CA-30524-88
Kraft Card Blanks 6"x6" X20  ACC-CA-30753-66
Barbara's Words Sticker Collection  ACC-SC-30849-A5

Step 1: Die cut the 4rd largest nested picot square on regular parchment paper using the Nested Squares Picot dies. Emboss the double outline from the matching Nested Picot Squares Groovi plate using the 1mm embossing ball tool (or Groovi No.1).

Step 2: With the front side up, using Groovi tabs, stick the parchment over the Straight Pattern No.1 Groovi Border Piercing Grid plate and perforate the border pattern using the 1-needle bold perforating tool.

Step 2: Remove the parchment, turn it over to the back and stick it over the Straight Basic Groovi Border Piercing Grid plate. Emboss dots between the perforations using the 1.5mm embossing ball tool (or Groovi No.2).

If you want to learn more about using these straight and diagonal lace pattern border grids there are iibooks to help you along with lots of inspiration for different ways of using the grids.
The bundle has a beginner book and an intermediate/advanced book for the Straight Pattern No.1 Groovi Border Piercing Grid and a beginner book and an intermediate/advanced book for the Diagonal Pattern No.1 Groovi Border Piercing Grid.

For individual iibooks, look on here  https://claritystamp.com/collections/books.

Step 3: Use the Nested Picot Squares Groovi plate and the 1mm embossing ball tool (or Groovi No.1) to emboss a double outline on either side of the lace design.

Step 4: Emboss the bamboo from the Bamboo plate using the the 1mm embossing ball tool (or Groovi No.1).

Step 5: Emboss the netting from the Large Lace Netting plate using the the 1mm embossing ball tool (or Groovi No.1).

Step 6: Still working on the back, colour on either side of the lace panel using Perga Liner B7 and B16 pencils.  Using a piece of kitchen roll folded into a square, followed by diagonally to bring it to a point, blend the colours using a small amount of Dorso oil.

Step 7: Once the oil has evaporated and the work is completely dry, on the back, bamboo, parts of the netting and between the double outlines using Perga Colours Exclusive pens, PCE13, PCE16, PCE17 & PCE18. Let the colouring dry otherwise the colour will smudge.

Step 8: On a spare piece of parchment, emboss the 2 butterflies from the Bamboo plate using the the 1mm embossing ball tool (or Groovi No.1).

Step 9: Freehand emboss inside the wings and body using the Pergamano shader tool.

Step 10: Turn the parchment to the front, using the 2-needle bold perforating tool, perforate outside the butterflies.

Step 11: Picot cut between all the perforations making sure the scissors are over the waste when you cut.

To Finish: Mount the piece on Kraft card picot cut using the 3rd from outside die and a piece of parchment 12.5x12.5cm using brads. Stick this on Indian Summer designer paper 14x14cm,  14.5x14.5cm white card and 6"x6" folded Kraft card. Stick the butterflies on using a teeny tiny amount of Perga Glue on the back of the butterfly bodies. Stick a word sticker and some sequins.


Groovi plates and ingredients are available on  http://www.claritystamp.com.

 Enjoy and Take care.

Sending everyone STAY SAFE WISHES sprinkled with PERGA GLITTER. 

Love and laughter
Tina x

Paint A Butterfly #HappydayClarityday

Good Morning. How is everyone doing?

A couple of weeks ago I had showed you the butterflies I had painted years ago and said I would do a step by step for painting a butterfly. Its taken me a while but finally got round to doing it today. So here goes ...


Ingredients:
Groovi Plate Starter Kit Deluxe  GRO-SK-40571-XX
Tina's Butterfly Fun A5 Square Groovi Plate  GRO-AN-40856-03
Nested Squares Picot Cut Die Set  ACC-DI-30666-66
Alliums Aperture Clarity Fresh Cut Die  ACC-DI-30765-44
Pergamano 6mm Ball Tool - Extra Large PER-TO-70016-XX
Perga Colours & Mix-Mat Bundle  PER-AC-70353-XX
Round Brush No.2  PER-BR-70044-XX
Clarity Lightwave LED Light Panel + Free A4 Translucent Piercing Mat  ACC-LP-30352-A4
Groovi Sticker Tabs  GRO-AC-40437-XX
Groovi A5 Parchment (20 Sheets)  GRO-AC-40020-XX
Perga Glue  PER-AC-70133-XX
Micron Pen Set of 7  ACC-PE-30778-XX
Barbara's Words Sticker Collection  ACC-SC-30849-A5
Card Blanks 5”x5” White x20  ACC-CA-30617-55

Step 1: With the plate smooth side up, trace the butterfly from Tina's Butterfly Fun plate with the No. 01 Micron pen.

 Step 2: Rub the colour from the pens, PCE27 and PCE16, on the Mix Mat Water

Step 3:  With a damp brush, pick up the PCE27 colour on the tip of the brush from the palette. Using a feathering/flicking motion, on the front, add fine thin strokes on the top butterfly wings both from the inside of the wing to outside and outside of the wing to inside. Repeat with PCE 16 for the lower wings. If the brush is too wet, the parchment will buckle. Practice on a piece of parchment so you get smooth strokes. I didn't worry too much about going outside the black outline as I was going to cut the butterfly out.

Step 4:  Rub the colour from PCE14 on the palette. Paint even finer and shorter lines using just the tip of the brush from outside to inside of all the butterfly wings. Make some strokes long and some shorter to avoid a 'band'.

Step 5: Paint even shorter strokes from outside to inside of the wings using PCE12 after rubbing the colour on the palette and picking it up on just the tip of the brush, once again remembering to make some strokes short and some longer.

Step 6: Rub the colour from PCE20 on the palette and paint tiny strokes from the outside of the wings to the inside.

Step 7: Paint the butterfly body with PCE20. Using the Pergamano 6mm ball tool, emboss the butterfly wings on the back very gently as we don't want to change the colour but just give the wings a slight curve. Cut out the butterfly. If you prefer you can use your 2-needle perforating tool and picot cut.

Step 8: Stick the 7th from inside square from the Nested Squares Picot Cut Die Set and the Alliums Aperture Clarity Fresh Cut Die on black card using a Groovi tabs and run it through your die cutting machine.


Step 9: Cut a piece of white glitter card to the size 11.5x11.5cm and black card to the size 12x12cm. Layer and stick the card pieces on 5"x5" folded white card and stick the word sticker. Stick the butterfly on the card using a tiny amount of Perga glue on the back of the body.

Check out the amazing sale that is still on at www.claritystamp.com for lots of bargains. Don't forget the sale ends tonight at midnight. Take care. enjoy.

Sending everyone STAY SAFE WISHES sprinkled with PERGA GLITTER. 

Love and laughter
Tina x

Saturday, 20 June 2020

Another for #HappydayClarityday

So here we go with another step by step piece for today ...


Groovi Plates:
Groovi Plate Starter Kit Deluxe  GRO-SK-40571-XX
Alphabet & Numbers A4 Square Groovi Plate Mate  GRO-WO-40875-21
Nested Squares Picot Cut Die Set & Groovi Plate  ACC-DI-30698-66
Nested Scallops Squares Extension A4 Square Groovi Plate  GRO-WO-41168-15
Tina's Daisy Frame & Dandelion Tag A5 Square Groovi Plate GRO-FL-41180-03
Tina's Geo Layering Rectangles A5 Square Groovi Plate  GRO-PA-41076-03

Other Ingredients:
1mm Pergamano Ball Tool - Extra Small  PER-TO-70011
1.5mm Pergamano Ball Tool - Small  PER-TO-70004-XX
Embossing Tool 1.2mm Shader  PER-TO-70003-XX
2-Needle Bold Perforating Tool  PER-TO-70279-XX
Pergamano Ringlock Scissors  PER-TO-70041-XX  (or Pergamano Exclusive Pointed Scissors or Perga Cutter - curved)
Pergamano Pen and Nibs  PER-AC-70300-XX
Perga Liners - Combi Box  PER-CO-70063-XX
Dorso Oil  PER-CO-70066-XX
Perga Colours Exclusive  PER-CO-70060-XX
Clarity Lightwave LED Light Panel + Free A4 Translucent Piercing Mat  ACC-LP-30352-A4
Groovi A5 Parchment (20 Sheets)  GRO-AC-40020-XX
Groovi Guard  GRO-AC-40345-XX
Groovi Sticker Tabs  GRO-AC-40437-XX
A4 Translucent White Super Foam  GRO-AC-40603-A4
A4 Picot Foam  GRO-AC-40625-XX
Perga Glitter Bundle  PER-AC-70305-XX
Pergamano Brads Bundle  PER-AC-70287-XX
Indian Summer Designer Paper  ACC-CA-30525-88
Card Blanks 7”x7” White x20  ACC-CA-30620-88

 Step 1: Die cut the 3rd largest nested picot square on regular parchment paper using the Nested Squares Picot dies. Emboss the double outline from the matching Nested Picot Squares Groovi plate using the 1mm embossing ball tool (or Groovi No.1).

Step 2: Emboss the floral design, tag and a rectangle outside the tag from the Tina's Daisy Frame & Dandelion Tag plate using the Pergamano 1.5mm embossing ball tool (or Groovi No.2) for the circles and the rest of the design using the Pergamano 1mm embossing ball tool (or Groovi No.1).

Step 3: Emboss the rectangle panel from the Tina's Geo Layering Rectangles plate using the Pergamano 1mm embossing ball tool (or Groovi No.1).

Step 4: Emboss the greeting from the Nested Scallops Squares Extension plate using the Pergamano 1mm embossing ball tool (or Groovi No.1). Freehand emboss in the circles using the Pergamano 1.5mm embossing ball tool (or Groovi No.2)

Step 5: Still working on the back, colour the tag and sections in the rectangle panel with Perga Liner B8 and B11 and blend with Dorso oil.

Step 6: Once the oil has evaporated and the work is completely dry, on the back, colour the leaves and flower centre with Perga Colours Exclusive No.16 and between the double outlines with Perga Colours Exclusive No.26 as seen in the photo. Let the colouring dry otherwise the colour will smudge.

Step 7: From the front, perforate inside the leaves, triangles and tear drops on the bottom of the tag using the Pergamano bold 2-needle perforating tool. Picot cut between all the perforation using parchment scissors or Perga cutter.

Step 8: On Indian Summer Designer Paper, die cut the 2nd largest nested picot square and on white card the largest nested picot square using the Nested Squares Picot dies. Add a little sparkle on the card using a mapping pen, sticky ink and Perga Glitter.

To Finish: Mount all the pieces using brads and stick this on 8"x8" folded white card. Use mini glue dots to stick a bow and sequins to the card.

Groovi plates and ingredients are available on  http://www.claritystamp.com. Have you checked out the sale on there yet? Grabbed lots of bargains?

 Enjoy and Take care.

Sending everyone STAY SAFE WISHES sprinkled with PERGA GLITTER. 

Love and laughter
Tina x

#HappyDayClarityDay

Hi everyone,

Hope everyone is well as are their loved ones? We are all good at mum's, still staying indoors unless I need to go out for essentials. I'm still not confident enough to venture out for more than that. Yesterday and today would have been the Clarity open days but due to Covid-19 that isn't happening so that everyone can stay safe. However, ClarityStamp headquarters came up with an excellent idea of doing it online where we can still celebrate the open day by sharing our makes on social media and use #HappydayClarityday when sharing our work. If you are not on ClarityStamp groups on Facebook, join them as there is a whole loving, caring and encouraging community that is always ready to help and support you while sharing their beautiful makes. Watch out for the giveaways, blogs, step by steps on :-

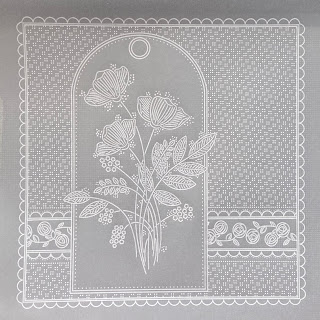
Today I want to share with you the step by steps for this Floral Tag card...


Groovi Plates:
Alphabet & Numbers A4 Square Groovi Plate Mate  GRO-WO-40875-21
Calligraphy Alphabet A5 Groovi Plate Mate  GRO-MA-40517-08
Nested Scallops Squares Extension A4 Square Groovi Plate  GRO-WO-41168-15
Nested Arch Tags A5 Groovi Plate  GRO-PA-41465-04
Tina’s Floral Spray A6 Groovi Plate  GRO-FL-41401-02
Straight Super Fine A4 Groovi Piercing Grid  GRO-GG-40626-17

Step 1: Emboss the 3rd from outside double square outlines and scallops from the Nested Scallops Squares Extension plate using the Pergamano 1mm embossing ball tool (or Groovi No.1).

Step 2: Emboss the floral design from the Tina’s Floral Spray plate using the Pergamano 1mm embossing ball tool (or Groovi No.1).

Step 3: Emboss the tag from the Nested Arch Tags plate around the floral design using the Pergamano 1mm embossing ball tool (or Groovi No.1).

Step 4: Emboss lines, scallops and dots from the Nested Scallops Squares Extension plate as seen on the photo using the Pergamano 1mm embossing ball tool (or Groovi No.1).

Step 5: Emboss the floral border from the Nested Arch Tags plate using the Pergamano 1mm embossing ball tool (or Groovi No.1).

Step 6: Emboss lines, scallops and dots from the Nested Scallops Squares Extension plate below the floral border using the Pergamano 1mm embossing ball tool (or Groovi No.1).

Step 7: Emboss the grid design over the Straight Super Fine A4 Groovi Piercing Grid plate using the Pergamano 1mm embossing ball tool (or Groovi No.2). If you want larger dots, use the Straight Basic Bold A4 Groovi Piercing Grid plate (GRO-GG-40528-17) and the Pergamano 1.5mm embossing ball tool (or Groovi No.2).

Step 8: On the back, colour the tag and flower border with Pergaliner B pencil (B14) and blend with Dorso oil.

Step 9: Still on the back, colour the flowers, leaves and between the double square outlines with Perga Colours Exclusives (No.5, No.9 and No.17).

Step 10: From the front, perforate inside the scallops and outside the main card using the Pergamano bold 2-needle perforating tool and picot cut between the perforation.

To finish: Mount the piece on Rainbow River designer paper using brads and stick it on white card. Stick a bow at the top using a glue dot.

Looking forward to seeing everyones creations using these Groovi plates. For the products used here, visit http://www.claritystamp.com. They have a massive sale, their biggest sale they have ever had with most products on sale they have had on offer at one time so check out their website and grab the bargains. Enjoy. 

 Love you all. Take care.

Sending everyone SAFE WISHES sprinkled with PERGA GLITTER. 

Love and laughter
Tina x

Tuesday, 25 February 2020

Be Kind

I love this quote - "In A World Where You Can be anything, Be Kind" I am blessed with so many kind, loving, supportive friends and family and am aware that so many are not in such a lucky position like I am. For some life is a daily struggle much more than it may be for me or you on any given day. Being kind is something we can all do because we meet a lot of people who are fighting a battle or two that we know nothing about. A kind word or gesture has the power to change someone's day for the better. With this on my mind since this morning I thought I would create something that I can keep out on my desk to be a reminder so that I never forget the importance of kindness.


Groovi Plates used:
Nested Squares Extension & Alphabet Frame - GRO-WO-40538-15
Nested Lace Heart Border Frames - GRO-PA-41429-03
Tina's Floral Doodle Wreath - GRO-FL-40830-03
Floral Moon - GRO-FL-40446-03
Buckingham Palace Lace Corner Duet - GRO-GG-41244-12

1.) On a piece of parchment, emboss the 6th from outside square from the Nested Squares Extension & Alphabet Frame plate using Pergamano 1mm embossing ball tool (or the Groovi No.1 tool).

2.) In the middle, emboss the largest frame from the Nested Lace Heart Border Frames plate using Pergamano 1mm embossing ball tool (or the Groovi No.1 tool).

3.) Ofset slightly from the centre and emboss the little floral wreath from Tina's Floral Doodle Wreath plate using the Pergamano 1.5mm embossing ball tool (or the Groovi No.2 tool) for the little circles and the Pergamano 1mm embossing ball tool (or the Groovi No.1 tool) for the rest of the design.

4.) Over the Floral Moon plate, emboss the design between the lace frame and the wreath using the Pergamano 1.5mm embossing ball tool (or the Groovi No.2 tool) for the little circles and the Pergamano 1mm embossing ball tool (or the Groovi No.1 tool) for the rest of the design.

 5.) In the corners, emboss the lace design from the Buckingham Palace Lace Corner Duet plate using Pergamano 1mm embossing ball tool (or the Groovi No.1 tool).

6.) Between the corners, emboss the dots from the outer design of the  Buckingham Palace Lace Corner Duet plate using Pergamano 1mm embossing ball tool (or the Groovi No.1 tool).

7.) Freehand emboss the circles using the Pergamano 1.5mm embossing ball tool (or the Groovi No.2 tool).

8.) Still working on the back, colour with black Pergaliner B pencil.

9.) Blend the colouring using Dorso oil and blending pen and nibs.

10.) Once the Dorso oil has evaporated, colour the flowers and leaves using the black Perga Colours Exclusive pen.

 11.) Freehand emboss lines between the embossed dots of the grid lace pattern using the Pergamano 0.5mm embossing ball tool (or the Groovi No.1 tool).

 12.) I also added extra colour on the back using the Perga Liner B pencil between the grid lace design and the lace frame design. So although the colouring on the above photos looks like a mess, on the front it looks very pretty and neat ... MAGIC.

13.) On the front, using the Pergamano bold 1-needle perforating tool, perforate the design from the Buckingham Palace Lace Corner Duet plate.

14.) Picot cut between the corner lace perforations using parchment scissors or Perga Cutters.

15.) Add some sparkle on the parchment piece with sticky ink, mapping pen and Perga Glitter. Mount the work on black and white card stock using brads and stick this on folded white card. In the centre of the wreath design, I have stuck a 'Be Kind' sticker from Barbara's Words Sticker Collection. I added a few sequins on the card just to add more sparkle because, well, it makes me happy.


Check out http://www.claritystamp.co.uk for the Groovi plates, tools and materials.

 Love you all. 

Enjoy. Take care.

Love and laughter
Tina